Key Topics : Interfacing Level Shifters/Converters with 5V and 3.3V TTL logic devices.
Getting Started with Bluetooth module
 |
| 3.3V compatible Bluetooth Modules |
List of components you will need,
- Arduino Uno
- HC-05 Bluetooth module. (even HC-06 would be fine for this example)
- Logic Level converter/Shifter (3.3V to 5V Bidirectional Converter)
- Bread Board
- Jumper wires
- Android mobile phone and a computer
- Bluetooth SPP Pro mobile app
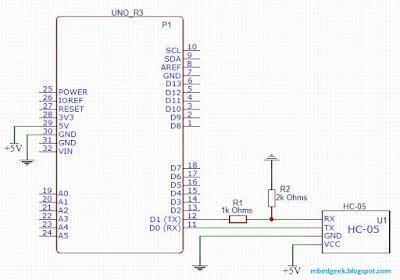
Simple Way, Would It Work With Resistor Voltage Dividers?
 |
| How to connect Bluetooth modules to Arduino without any converters |
As I mentioned earlier 5V logic level can damage Bluetooth modules which are 3.3V in logic level ! Therefore we can use resistor voltage dividers to match the voltage. This will ensure the safety of your Bluetooth module.
Although 2V is considered as the minimum input high voltage in 5V operated devices, still there could be issues with interfacing 3.3V devices with, some of the commercially available 5V devices. Therefore we'll see how to convert both RX and TX of the TTL serial communication.
(Since speed, size and power has been a consideration over the past years there has been changes in logic levels. And logic level translation using level shifters is a bit more serious topic to speak about.)
(Since speed, size and power has been a consideration over the past years there has been changes in logic levels. And logic level translation using level shifters is a bit more serious topic to speak about.)
How to Connect : The Proper Way
 |
| How to connect Bluetooth module using level shifters |
If you do not have 3.3V available to bias the level shifter, (ex: custom made Arduino board with no 3.3V) you can use a resistor voltage divider using 1k and 2k resistors. (which may not be the ideal way, but it works, It is always better to use a LDO (Low Dropout Regulator) regulator like AMS1117-3.3V to create 3.3V)
Lets Code It
/*This Arduino code will read data from arduino serial monitor and print onto the software Serial and vise versa.
  Software serial can be connected to a bluetooth device and can demonstrate a two way communication between the
  mobile phone and arduino using an app like bluetooth spp pro

  Reference : Arduino software serial example

  Coded by : Manjula Karunarathna
  Date : 11th Nov 2018

*/


#include <SoftwareSerial.h>

int rx_pin = 10;                          //defining software serial pins (RX and TX) for arduino uno
int tx_pin = 11;
SoftwareSerial BluetoothSerial(rx_pin, tx_pin);


String HD_Read_String;                   //initialize a string to read data from hardware serial terminal

void setup() {

  Serial.begin(9600);                    // set the data rate for the Hardware Serial port
  Serial.println("Hardware Serial is working !");


  BluetoothSerial.begin(9600);            // set the data rate for the SoftwareSerial port
  BluetoothSerial.println("Software Serial and Bluetooth is working !");

}

void loop() {
  if (BluetoothSerial.available())       //Read from Bluetooth and print onto Hardware Serial
  {
    Serial.write(BluetoothSerial.read());
  }

  while (Serial.available())             //Assign data on hardware serial terminal to a string, run the loop while serial data is available
  {
    delay(1);                              //delay allows byte to arrive in input buffer
    char c = Serial.read();
    HD_Read_String += c;
  }

  if (HD_Read_String.length() > 0)         //Check whether HD_Read_String was updated
  {
    BluetoothSerial.println(HD_Read_String);

    HD_Read_String = "";                   //reset the HD_Read_String to a null value
  }
/*if you are dealing with only integer values you can use Serial.parseInt() command instead of using a char array which, is much easier */
}
To understand this part of the project you need to have a rough idea on what software serial is. I've used a software serial to interface Bluetooth module and Arduino and the hardware serial port (UART) to communicate between the PC and Arduino. Using this you can send any text between the PC and a mobile phone for both ways.
Android mobile app I've used is "Bluetooth SPP pro" which is pretty decent to such applications. Use the command line mode after pairing and connecting with either HC-05 or HC-06 Bluetooth module. (normally pairing code is either 1234 or 0000)
If you are going to work with only integers or if you are going for an application like output controlling you can even work with "Serial.parseInt()" which is much easier than going for a char array.
Hope this would help to solve your issues on Bluetooth communication.


