Key Topics : Arduino Blink, Calculating the current limiting resistor value, Blink without delay
Arduino Blink Explained
This can be considered as your "Hello World" command in Arduino Journey. This comes as the default loaded code in Arduino. Digital 13 Pin is the LED Builtin pin for Arduino Uno and Mega. You can use any I/O pin including Analog inputs as per your preference.


Arduino IDE >> File >> Examples >> 01.Basics >> Blink
To use any pin as an Output
 |
| Digital pin 6 as the Output |
 |
| Analog pin 2 as the Output |
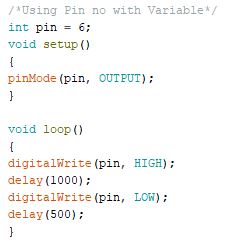
However when you have large no of I/Os and code is much more complex, It is easier to keep tracking of the Inputs and Outputs using variables. Therefore see the below example for using variables to hold the Input or Output pin number. This way you only need to change the pin no in Variable declaration to change it in entire code.
Calculating the current limiting resistor value
Generally we put 270 Ohms or 330 Ohms resistors in series when selecting a current limiting resistor. However most people does not have an idea about selecting the resistor. Understanding the concept behind this will help you to select current limiting resistors for different scenarios. Also it is really important to verify that heat emission is lesser than the wattage of the resistor. We will discuss that in a separate post.


V1 = 2.2V (assuming 2.2V rated LED)
Therefore,
V2 = 2.8V (Above equation, Kirchhoff's Voltage Law)
Applying Ohms Law for the R resistor,

Since 280 Ohms resistors are not available we can select either 270 Ohms or 330 Ohms resistors. However this value can be changed depending on the current LED draws.(depend on the colour, size etc of the LED)
Arduino Blink without delay
Disadvantage of DelayDuring delays, Arduino will pause your program till the given delay and it will not execute other tasks. (Except Interrupts which we will be discussing later) However there are scenarios that we need to do more than one task at the same time.
Schematic for this example is same as the Arduino Blink (LED pin connected to the 13th pin/Or Builtin Pin)
To understand this code you need to have some idea about the millis() function in Arduino. millis() return the time in milliseconds since the Arduino board powered up.
You can download the code from below link.
Blink_Without_Delay_Code (mediafire)
/*This Arduino code will blink an LED without using delay function

  Reference : https://www.arduino.cc/reference/en/language/functions/time/millis/

  Coded by : Manjula Karunarathna
  Date : 22nd Nov 2018
*/

unsigned long PreviousTime = 0;             //To Save the last time we changed the state of LED
const unsigned long delayTime = 1000;       //Delay Time we need to Blink the LED
/*It is important to save the millis() value in an unsigned long variable since it returns the value in that format*/

volatile byte state = LOW;                  //To save the State of the LED
int BlinkPin = 13;                          //Pin No to connect the LED

void setup()
{
pinMode(BlinkPin, OUTPUT);                  //Declaring the Output
}

void loop()
{
unsigned long CurrentTime = millis();       //Obtain the current Time and Save it in a Variable

if (CurrentTime - PreviousTime >= delayTime)    //Check the time lapse since last change of state in LED
{
  state = !state;                               //If given time exceeded, Change the State
  digitalWrite(BlinkPin, state);
  PreviousTime = CurrentTime;                   //Save the time we changed the state
}
}