Why we cannot operate relays directly using Arduino or any other microcontroller ?
Lets take a look at what Arduino Uno datasheet says,
 |
| Arduino Specifications Datasheet (Image Courtesy, farnell.com) |
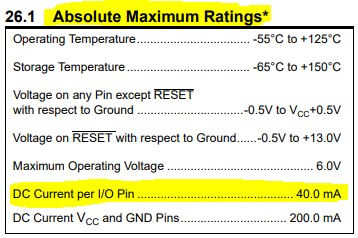
Since Arduino Uno consists with ATmega328P microcontroller, we'll have a look at its data sheet too.
 |
| ATmega328P Specifications Datasheet (Image Courtesy, microchip/atmel) |
Also Arduino.cc suggests DC current per I/O pin to be 20mA. So we cannot design anything for 40mA as it is the absolute maximum. Normally a small relay may consume a current starting from 20mA to 60 mA. However even if the current was enough, it can damage the microcontroller due to flyback voltage spikes that comes due to inductive load of the relay. Therefore even if it works, never connect a relay directly with a microcontroller.
 |
| Wrong connection of relay with microcontroller |
So there are few options we can use to connect relays, We'll go through couple of solutions.
Connecting relay using a transistor,
In this method, relay is not electrically isolated from the microcontroller. A freewheeling diode is recommended for the protection of the transistor. Output pin has to be high in order to power the relay coil.
 |
Connecting relay to a microcontroller using a transistor
|
 |
| Operate relay using a transistor |
Connecting relay using Darlington arrays
In this method also relay is not electrically isolated from the microcontroller. However this will be one of the best option when we have to connect a series of relays for a microcontroller. Since this darlington array I've selected has inbuilt freewheeling diodes, there is no need to add flyback protection for this.
 |
| Connecting relay to a microcontroller using a Darlington Array |
 |
| Operate relay using a Darlington Array |
Connect Relays using Opto-couplers
Even though this circuit is little more expensive than the previous methods, it has a great advantage over previous methods. If your microcontroller circuit is delicate, susceptible to noise or sensitive, optocouplers in this circuit isolates the signal side from relay electrically. (connected optically)
Lets see how we connect it if we choose to switch the ground connection. In this method output of 0 V will operate the relay. Advantage of this method is that we can choose the supply voltage of the microcontroller/ separate voltage source to operate the relay.
 |
| Connecting relay to a microcontroller using Opto-couplers, Low Side |
Also we can switch the high side of the Opto-coupler where relay will operate when output signal is high. Diagram below highlights the electrical isolation too.
 |
| Connecting relay to a microcontroller using Opto-couplers, High Side |
 |
| Operate relay using an Opto-Coupler |